
After happily being a Mac guy for the last ten years, I have decided to have a go at building my own Windows PC.
Why, I hear you ask? Well, what I really wanted was a Mac that I could customize. A Mac where I could not only upgrade the RAM, but I could also swap out the graphics card, or maybe even upgrade the CPU. I was hoping Apple would release a new Mac Pro for the masses which would allow me to do all the above, but sadly, this wasn’t to be.
Apple did release a new Mac Pro in December 2019, but the price of the base model is around £5499 and the high-end model, with “all the whistles and bells”, will set you back an eye watering £53,448. Way out of my price range. Seriously though, who is paying £53,000 for a Mac Pro? Who did Apple even build this machine for?
This is where the build nearly went out of the window. This now meant that I had to unscrew the motherboard, remove the problematic I/O panel and start all over again.
To fill you in a little, the last time I owned a PC, it had Windows XP installed on it. So, I’ve been out of the Windows game for quite some time.
I’ve seen and used other variations of Windows (Windows 7, Windows 10, etc), like when I’ve been fixing a friend’s laptop, or helping a family member with something or other. I just have no real time on the latest versions of the Windows OS.
I’ve also never built a computer before, ever. The most I have ever done is upgrade some RAM in both Mac and Windows machines. Swapped out some hard drives and replaced a fan in a laptop.
I am an absolute nOOb when it comes to this “building your own PC” malarkey, so I will have to learn everything as I go along.
After watching lots of YouTube videos from the likes of Linus Tech Tips, Jayz Two Cents and Pauls Hardware, and searching the internet for reading resources, I finally got an understanding of the components I would need in order to build my ‘rig’.
There are seven basic components that you need in order to build a PC, the case, motherboard, CPU (and heat sink), memory, GPU, storage and PSU (or power supply). Several of these components also have to be compatible with each other or stuff won’t work.
From what I can gather, you have a choice of either building an Intel PC or an AMD PC. I chose the latter. This wasn’t intentional, it kind of just happened.
Buying the Components
At the start of all this, I was a bit worried about the whole parts’ compatibility thing. I didn’t really understand what parts were compatible with what and I didn’t want to spend a bunch of money to find out I had purchased something I shouldn’t have.
Fortunately though, after watching one of Paul’s Hardware YouTube videos, he made me aware of a website called PC Part Picker, which will basically tell you what components are compatible with what hardware.
This removed some of the guess work when it came to purchasing parts and helped me from making a costly mistake. The site has lots of helpful features like creating your own ‘build list’ which you can save specific parts to that you want to include in your build.
It helps keep track of how much your build is going to cost and will also recommend where to get the best price for the hardware that you are looking for. You can also read reviews left by other PC builders on how good specific parts are, which is always handy before making a purchase. As a first time PC builder, this was an incredibly helpful tool which I had at my disposal.
For my first PC build, I decided to purchase the following parts:
- NZXT H510 Elite Mid-Tower – I knew from the very start of this project, that I wanted a nice clean looking case. I’m not a fan of these PC builds that a dripping in LED’s randomly displaying all the colours of the rainbow. I think it looks, well, a bit tacky.
- ASUS Prime X570-P ATX AM4 Motherboard – I had seen several reviews online of people both for and against this motherboard. I was in two minds whether to purchase one or not, but it seemed to do everything I wanted it to do, so I purchased one. This motherboard also supports the AMD chipset, which means Intel CPU’s will not work with this motherboard.
- AMD Ryzen 7 3700X 3.6 GHz 8-Core Processor – I’d read online that this was a decent mid-range CPU which also shipped with its own heat sink. If I needed to upgrade the heat sink, or add a radiator, I could do this at a later stage. I also wanted a CPU with a minimum of eight cores, which this has.
- Corsair Vengeance LPX 32 GB (4 x 8 GB) DDR4-320 – I wanted this build to have a decent amount of RAM, so I opted for 4 x 8 GB sticks in white, 32 GB in total. I did see several posts online of people saying that this RAM wasn’t running as the speed it should be, or wasn’t working properly when overclocked. I have no plans to overclock at this point, but only time will tell with regard to the running speed.
- MSI Radeon RX 580 ARMOR 8GB Graphics Card – When it came to the graphics card, I knew very little. All I knew was that I wanted a minimum of 8 GB of VRAM. I chose this card as it was getting good reviews, although there were some complaints of fan noise.
- Crucial P1 1 TB M.2-2280 NVMe PCIe SSD – This is the drive I am going to be using for the operating system.
- Seagate BarraCuda 4 TB SATA III 3.5″ HDD – I will be using this drive for storage.
- Seagate BarraCuda 2 TB SATA III 3.5″ HDD – I will be using this drive for storage.
- Samsung 860 EVO 1 TB 2.5″ SATA III SSD – This drive I will be using for storing applications.
- Corsair RM750 750W Modular 80+ Gold PSU – Again, I knew nothing about the power supply, but I have been told to pay particular attention to the wattage, the efficiency rating, and whether it is modular.
The Assembly
After waiting for what felt like an eternity for my parts to arrive, I was finally ready to have a go at assembling everything I had just purchased. So, with my toolbox by my side and my new-found knowledge of PC parts, off I went into the PC building wilderness.
I’d just like to point out that this is not a detailed, step-by-step guide on how to build a PC. I am simply documenting my experience, and the issues that I faced, when attempting to build my own PC while having no previous experience.
The Case
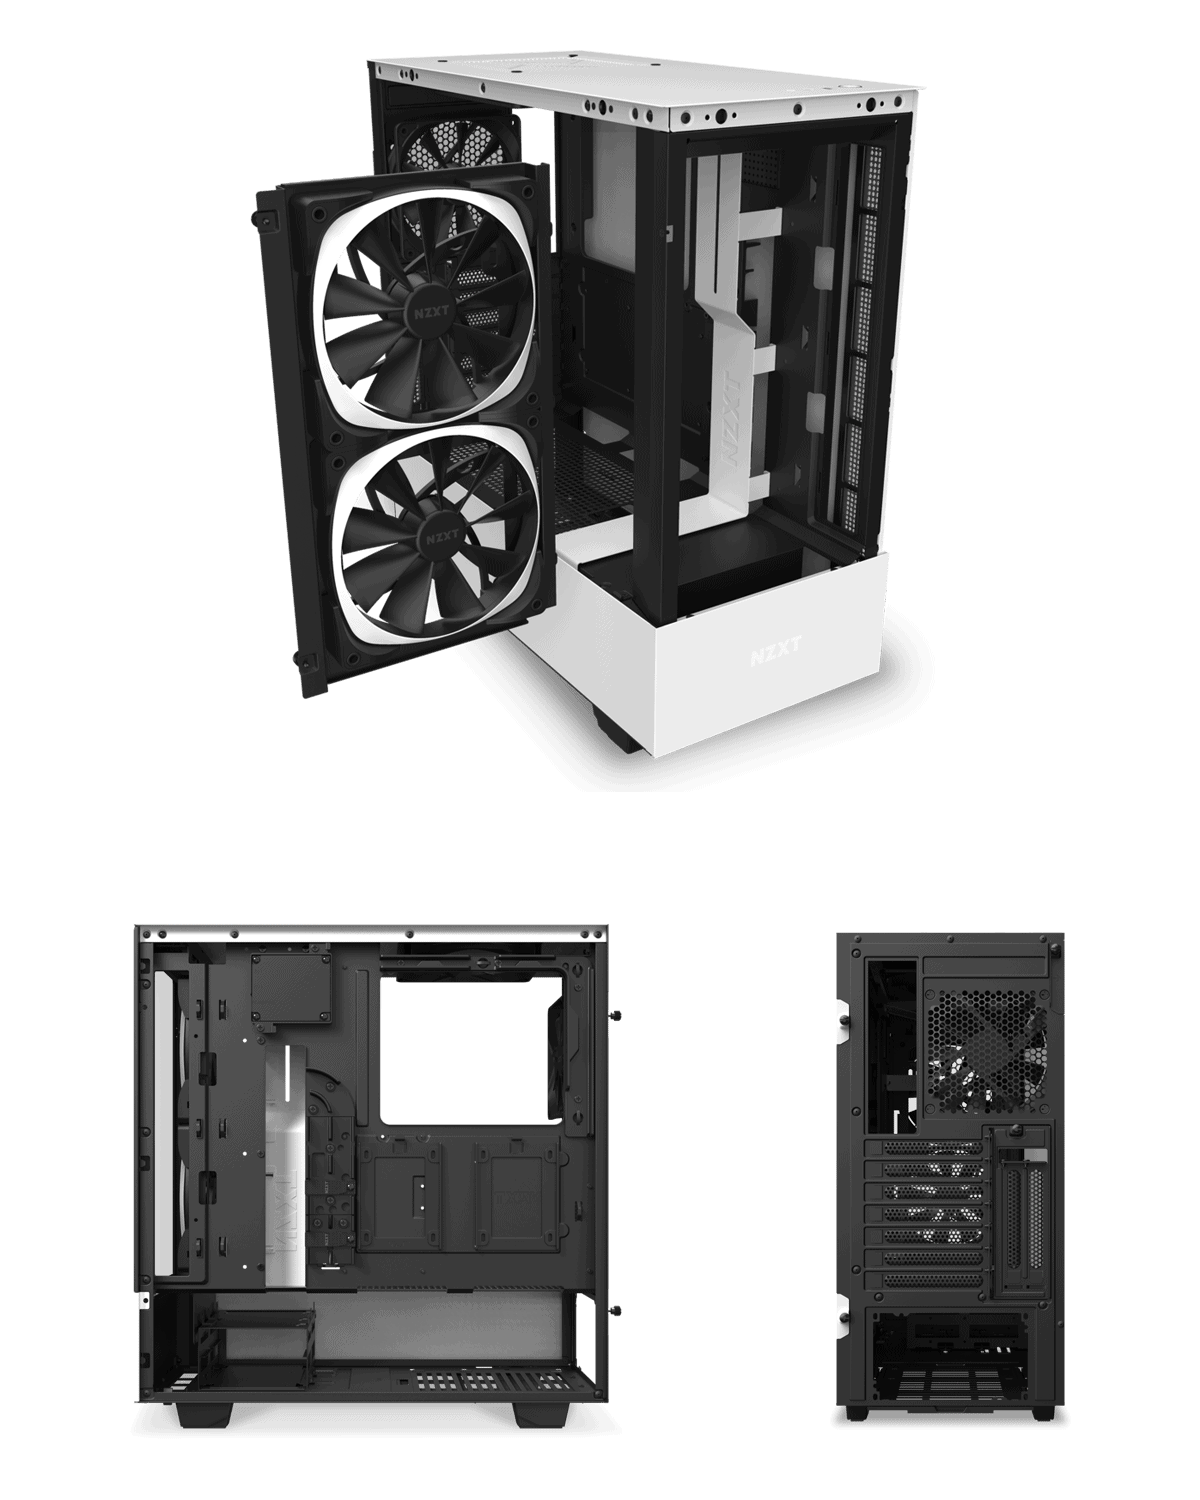
The first part I unpacked for the build was the case. I’d opted for the NZXT H510 Elite in white because it looked like a decent but clean looking case. It’s a mid-tower case which carries motherboard support for Mini-ITX, Micro-ATX and ATX form factors.
Removing the tempered glass panelling from the side and front of the case, as well as the solid panelling from the other side of the case was a straight forward enough process. You simply unscrew the thumb screws and lift the panelling out of its recess.
The case came with three fans already pre-installed. The two fans at the front of the case are 140 mm AER RGB 2 LED fans, whereas, the exhaust fan on the inside back of the case is 120 mm and has no LEDs.
This didn’t bother me too much as I had already planned on replacing this fan with an AER RGB 2 LED fan, as well as adding an AER RGB 2 LED exhaust fan to the inside top of the case. There is also a built-in RGB light strip across the inside top of the case.
All the fans and the LED light strip were wired up to NZXT’s Smart Device V2, which comes pre-installed in the case. It is used to power the built-in RGB light strip and case fans. You can also use NZXT’s CAM application software which allows you to adjust the LED colours and patterns of the fans and LED light strip, as well as control the fan speed and monitor the rest of the system.
The two issues I found with using this case were that the instructions were not as detailed as I was hoping for. NZXT use the approach that a simple diagram will suffice in showing you what to do. As a complete beginner, this just was not the case. A more detailed explanation of what I should have been doing, and where I should have been doing it would have been way more helpful.
The other issue I had was with the labelling of the screws and fixings. The bags are labelled, but they are done in such a way that mistakes can still happen (and they did).
Pros
- Three fans and the LED light strip were already pre-installed.
Cons
- Installation instructions were not as detailed as I was hoping for.
- Screws and fixings could have been better labelled.
CPU and Heatsink

After reading the instructions, the first thing I decided to do was to install the AMD Ryzen 7 3700X 3.6 GHz 8-Core Processor chip and the heat sink to the motherboard.
This was a relatively straight forward process except for having two cables in the box, which confused me a little.
The CPU fan cable was easy enough, you connect this to the heat sink for the CPU and then to the CPU fan header on the motherboard, easy right?
I was then left with two cables, a USB 2.0 cable and an RGB cable. The problem was, there is absolutely nothing in the instructions regarding these two cables and what these cables actually do.
Where exactly on the motherboard should I be connecting these cables, and do I need to connect both cables for everything to work?
This concerned me somewhat because I knew if the heat sink on the CPU wasn’t working correctly, this would overheat and fry the chip in no time at all, and this part wasn’t exactly cheap.
This annoyed me no end. Why would AMD instantly assume that the person buying their product would know what the cabling was for?
After some searching online, I found out that the USB cabling is what controls the RGB lighting on the heat sink. I also found out that if you connect both cables at the same time (which you can do), then you won’t be able to control the RGB lighting using the AMD software.
You would think that this would be something worth mentioning in the instructions, no?
After figuring all that out, I decided to use the USB cable as I wanted to be able to adjust the colour of the lighting on the heat sink.
Pros
- Easy to install.
- Thermal paste was pre applied.
- Ships with own heat sink.
Cons
- Instructions were missing some valuable information regarding the cabling.
RAM

Next, I installed the Corsair Vengeance LPX 32 GB (4 x 8 GB) DDR4-3200 RAM sticks which was as straight forward as it gets.
The bays that the RAM sticks clip into are colour coded in that two are black and two are grey (colours will vary depending on which motherboard you are using).
I believe if you are only installing one or two sticks of RAM to your build, then you should use the grey bays first.
Seeing that I will be installing 4 x 8 GB sticks, which will fill all the RAM bays, I won’t need to follow the colour coded protocol.
Installation was simple. Along the bottom of the RAM sticks are the connectors which slot into the bays. There is also a notch which lines up with the break that is in the slot.
RAM can generally only be installed one way, so line up the notch with the break and gently apply pressure simultaneously on either end of the RAM stick to push them into place.
You will hear it click when it is positioned and seated correctly.
Pros
- Easy to install and remove.
Cons
- None.
M.2-2280 NVMe PCIe SSD
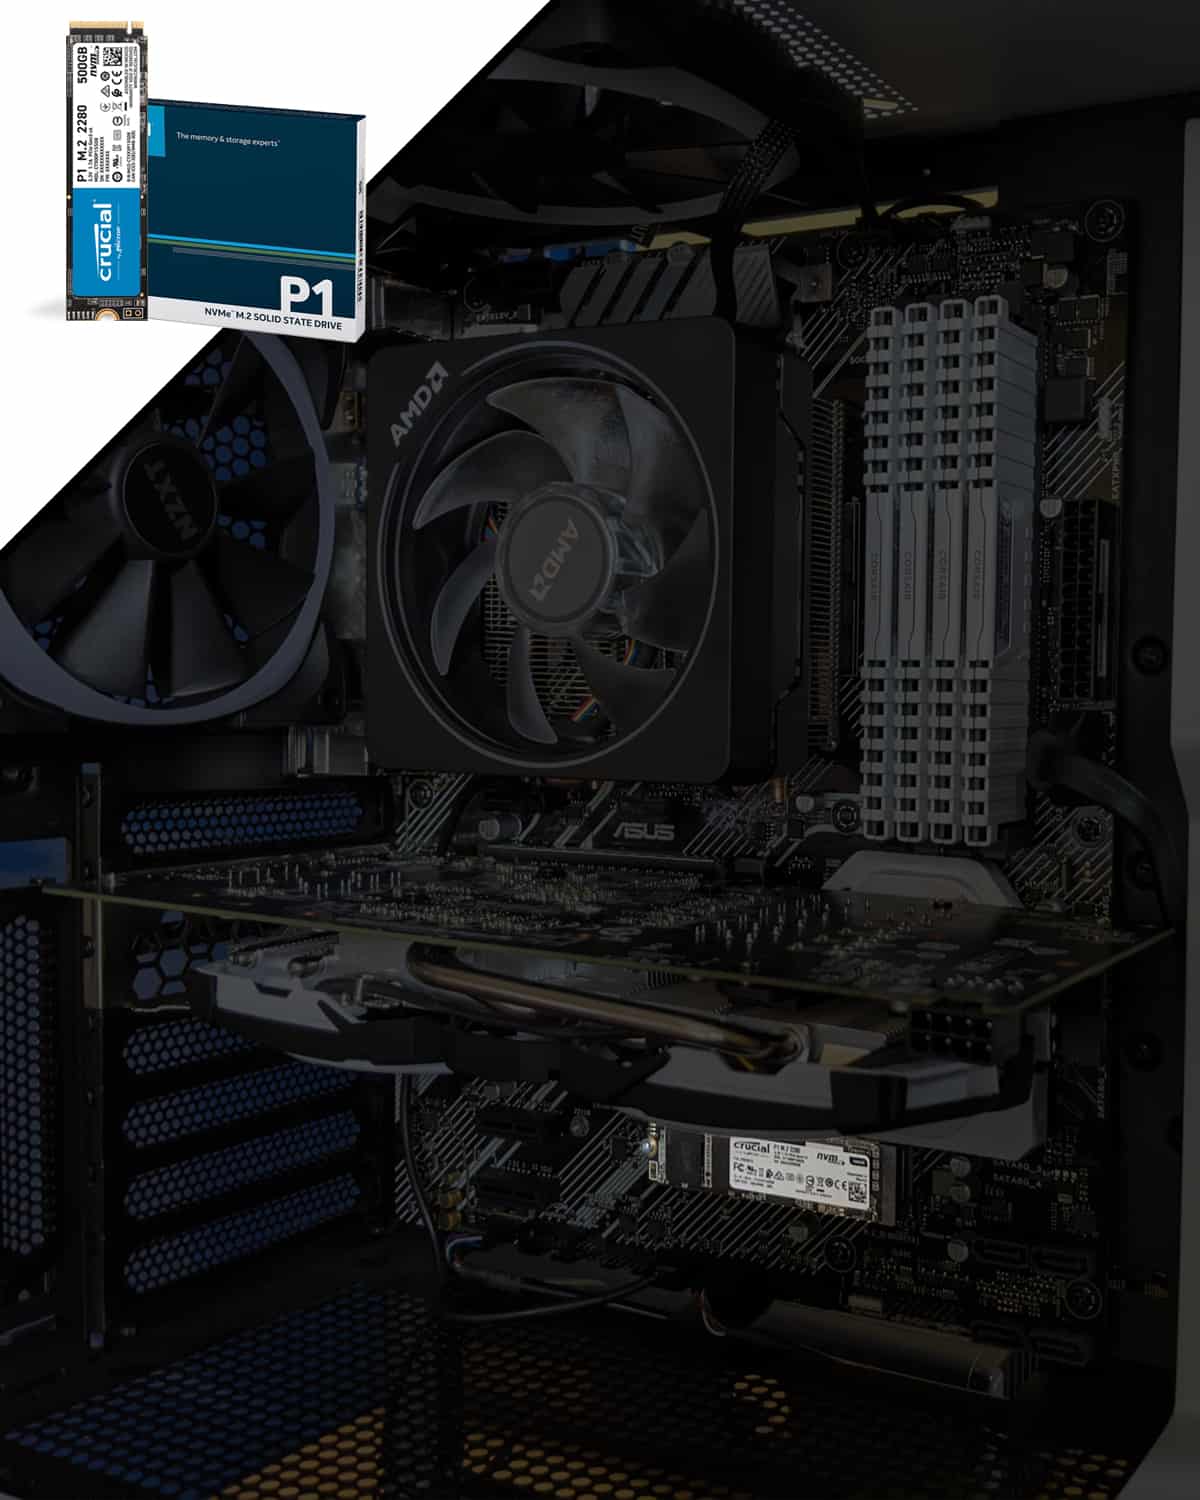
Once I had both the CPU (with heat sink) and RAM fitted to the motherboard, I decided to install the Crucial P1 1 TB M.2-2280 NVMe PCIe SSD hard drive.
This was the first time I had ever seen or attempted to install a M2 drive, so I was keen to see how this all worked seeing that there wasn’t any cabling involved (I hate cabling).
M.2 drives come in a variety of sizes, 2242, 2260, 2280 and 22110, so you need to make sure which sizes your motherboard supports.
Fortunately, the motherboard that I had chosen to use for my build had two M2 slots. One supporting 2242, 2260 and 2280, and the other supporting 2242, 2260, 2280 and 22110.
Installation could not be simpler. Connect the drive to the M2 connector on the motherboard, then lock down the other end of the drive to your motherboard with the provided screw. Job done.
This is the drive I will be installing the OS on.
Pros
- Easy to install and remove.
Cons
- None.
Motherboard

Once I had all the above components attached to the ASUS Prime X570-P motherboard, I decided it was time to have a go at installing the motherboard into the NZXT H510 Elite case. Again, this was a relatively straight forward process except for the I/O panel on the back of the case.
The I/O panel that ships with this particular motherboard is thin, and I mean real thin. It would not take much to damage this panel, so I knew I needed to be careful.
The other issue was that the panel was a poor fit in regard to the case, making the installation process more awkward than it need to be.
Once I did finally manage to get everything in place, I screwed the motherboard to the case only to discover that one of the small metal prongs on the I/O panel that surround one of the USB connectors on the motherboard was actually sitting inside the USB connector and not around it as it was supposed to sit.
This is where the build nearly went out of the window. This now meant that I had to unscrew the motherboard, remove the problematic I/O panel and start all over again.
Pros
- Easy to install (except for the I/O panel).
Cons
- Only has 2 x USB 2.0 headers.
- I/O panel was problematic.
- No wireless support.
- No bluetooth support.
- No USB-C support.
Graphics Card
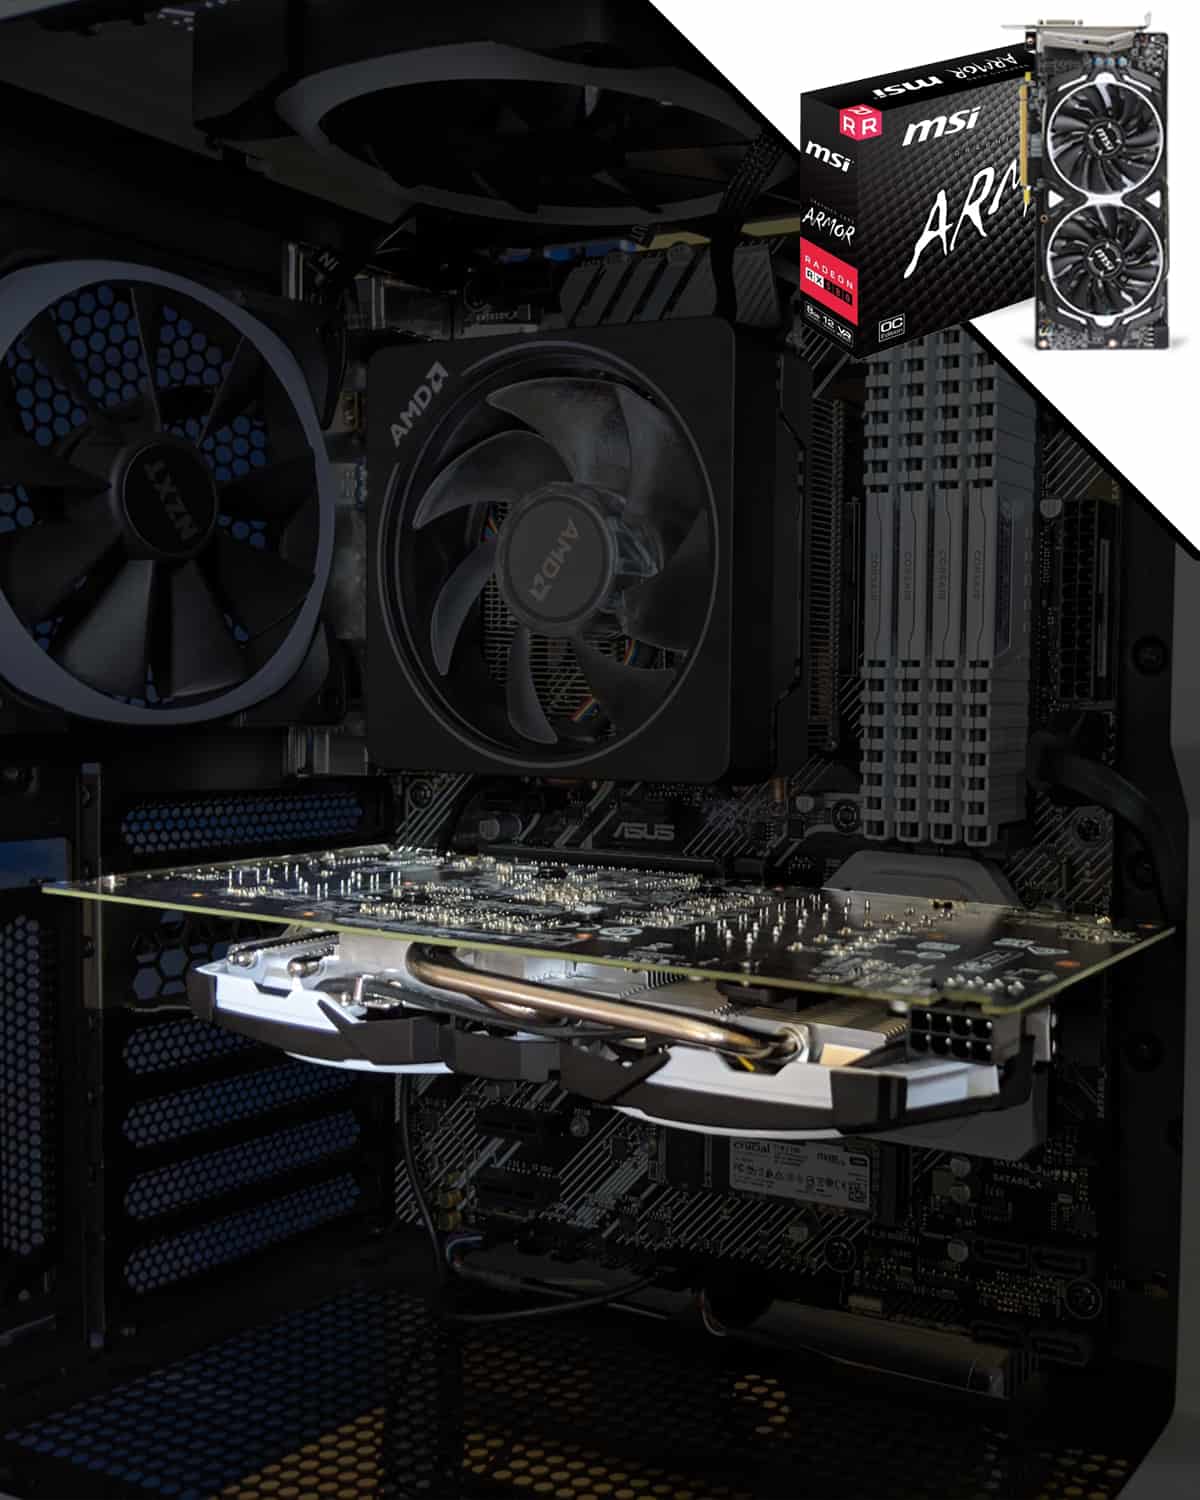
After I had calmed down, I set about installing the MSI Radeon RX 580 ARMOR 8 GB graphics card to the build.
First, I had to remove the backplate from the space at the back of the case where the graphics card ports will sit.
Next, I simply had to slot the graphics card into the PCI Express slot on the motherboard until it clicked, making sure it aligned with the slot on the back of the case. I then screwed it to the case to hold it in place.
The only issue I found with this card is that it suffers from slight ‘GPU sag’ if you route the cabling downwards.
This could probably be fixed by routing the cabling upwards and towards the back of the case, but this would also mean cabling running across the top right of the card.
I could use a GPU support bracket or try mounting the graphics card vertically. But, I can live with the ‘sag’, seeing that it isn’t too bad, so I am just going to run the cabling downwards.
Pros
- Easy to install and remove.
Cons
- Suffers from slight ‘GPU sag’.
Fans
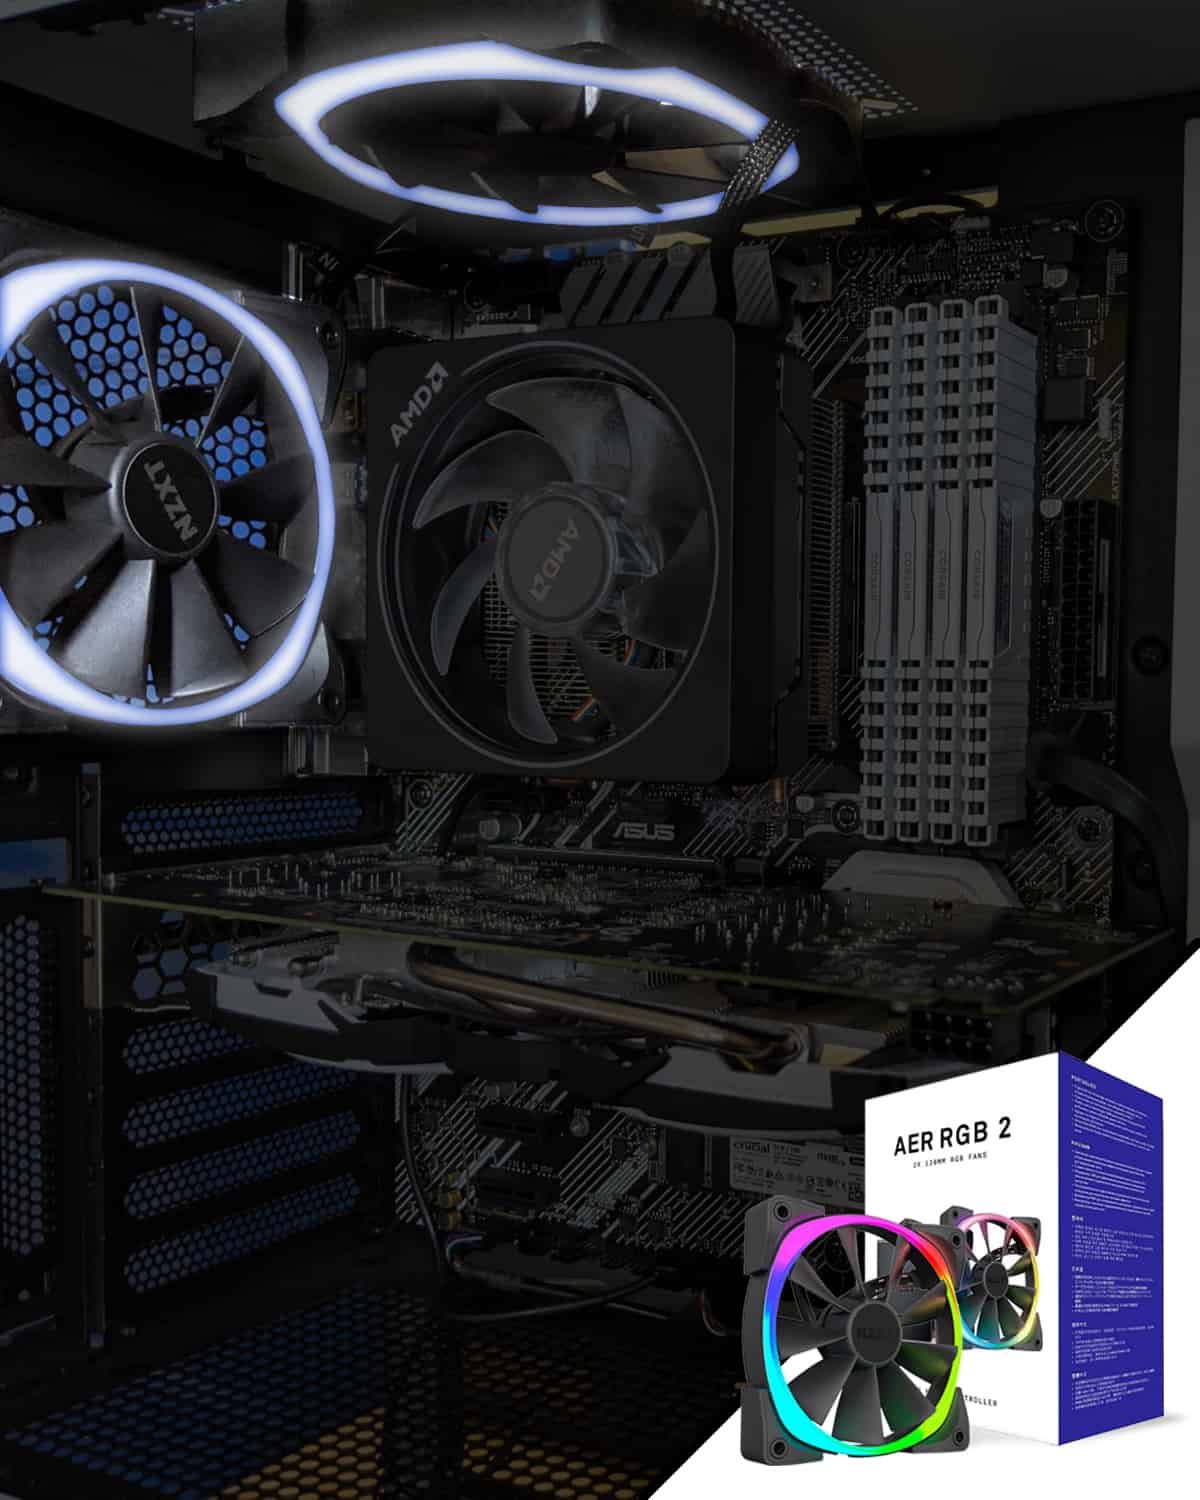
As I have previously mentioned above, three fans already came pre-installed in the case. Two 140 mm AER RGB 2 LED fans at the front, and a 120 mm exhaust fan on the inside back, which had no LEDs.
I decided to remove this exhaust fan and replace it with two NZXT 120 mm AER RGB 2 LED fans.
The first fan I added to the inside back of the case, and the other fan I added to the inside top. All vents and slots are already pre-cut into the case, so all I needed to do was to position the fans where I wanted them and then screw them in place. All that was left was to connect the cabling to power the fans and LEDs.
My initial understanding of how the fans worked was somewhat wrong, and this became apparent when I powered up the computer to check everything was working. All the fans were spinning, but only the front two fans were illuminating.
Due to my inexperience, I thought that the one cable coming out of the fan would control both the power and the LEDs, but this isn’t the case.
Apparently, you need two types of cabling. One to power the fan, and the other for the LEDs. You would think that they would be able to make this into one cable, right? The less cabling you have the better in my opinion. I absolutely hate cabling. I’m not sure if this is the same for all makes of fans, but NZXT fans have two cables.
This issue took me a while to troubleshoot. After some reading online, I discovered that in order to get the LEDs to work, I would need to daisy-chain the fans together with the fans on the front of the case.
This created yet another problem. When I purchased the two fans, in the box was a bag full of different cabling. There were multiples of the same type of cabling, but for the cabling I needed, there was only one, and I needed two.
I’ve no idea what all the other cabling is for, and the instructions were about as helpful as the case instructions. No problem, I thought, I will just go to NZXT’s website and order additional cabling. Nope! I wasn’t able to find anything on their website which allowed me to do this.
I did contemplate purchasing yet another NZXT AER RGB 2 LED fan, just so I would get the additional cable that I needed, but instead I decided to reach out to NZXT support to see if they would sell me the additional cable. The good folks at NZXT hooked me up with a box full of cabling, completely free of charge.
Once I had the cabling in place, which daisy-chained the fans together, everything worked.
Pros
- Easy to install.
Cons
- Installation instructions were not as detailed as I was hoping for.
- Lack of cabling.
Power Supply

The final piece of the puzzle was to add the power supply. I’d opted to use the Corsair RM750 750W Modular 80+ Gold PSU in my build.
I knew very little about PSU’s when going into this project, but I did know that I wanted it to be modular so that I could control the amount of cabling that’s connected to it (have I mentioned I hate cabling?)
This wasn’t exactly a difficult piece to add to the build, you simply connect it to the case using four screws.
My only advice would be to add the cabling for the components to the PSU first, prior to fitting it into the case. Once it is screwed in place, there is very little room to add and remove additional cabling.
I, of course, learned this the hard way which resulted in me having to remove the PSU several times before I finally got everything connected up and working.
This is a good reason why you would want to keep your cabling in order. I found that some cabling was just too long in length, resulting in me struggling to find room inside the case to house it.
Pros
- Easy to install.
Cons
- Difficult to add additional cabling without removing PSU from the case.
Additional Components
Besides the seven basic components that I used for building my PC (listed above), I also added the following additional components for extra storage and aesthetics:
- Seagate BarraCuda 4 TB SATA III 3.5″ HDD
- Seagate BarraCuda 2 TB SATA III 3.5″ HDD
- Samsung 860 EVO 1 TB 2.5″ SATA III SSD
- Individually Sleeved PSU Cables Type 4 Gen 4 in White
I decided to swap out the default PSU cabling in favour of white cabling to make the build more aesthetically pleasing. This was an additional step that I didn’t have to take to complete the build, but I’m happy I did.
While we are on the topic of cabling, it’s important to note that cable management is very important with these type of projects. There is very little room in the case once you have all your components installed and connected to the PSU, so you need to keep your cabling in order.
There is nothing worse that opening the side of a PC to see a rats nest of cabling. It looks awful, and it makes it harder to maintain or swap out components in the future.
Houston, We Have a Problem
After finishing the build, I was both excited and nervous switching the PC on for the first time. I was fully expecting something to either not work, or start billowing out smoke. Thankfully, I’m happy to report that everything worked as expected.
The only issue I have encountered with the build, was after a couple of weeks of using the PC. One night, it just locked up without warning. It never started to run slow or act weird before locking up, it just stopped dead to the point where I had to do a hard reset.
I initially never thought too much of it until it done the same thing four more times over the next month or so. There didn’t seem to be a pattern as to why this was happening, but I knew I had an issue that I needed to fix.
My initial thought was that I might have a bad RAM stick, seeing as bad RAM can cause systems to hang, so I decided to run a RAM test. Thankfully, this came back all clear. Next, I checked all driver versions and downloaded any updates that were available. Again, this didn’t fix the issue.
I decided to remove all the software that I had set up to launch when the computer starts, to see if this had any effect on the system locking up. Sure enough, this fixed the issue. After some further investigation, I’ve come to the conclusion that the problem software is the NZXT Cam software which controls the LEDs and monitors the system.
If I leave this software running in the background, the system locks up. I’m not sure if this is a bug with the NZXT Cam software or a conflict with another piece of software that I have installed. Either way, I only run this software if I need to. I do not leave it running in the background.
Final Thoughts

Custom PC Build – Front View 
Custom PC Build – Side View


If you have never built your own PC before, then I can not recommend it enough. I knew absolutely nothing about building a PC until I started this project. I now have a better understanding of how all the hardware works, and if I need to replace any parts in the future, I am equipped with the knowledge to do so.
For my first ever PC build, I was more than happy with the way things turned out. I set out to build a nice clean looking PC and I think I’ve managed to do that. There is a great sense of achievement when you reach the end of projects like this, especially when you switch it on and see it just work.
At the start of this project, I set myself a budget of £2000 (about $2765 USD). This wasn’t just for building the tower, this was for everything, tower, monitor, keyboard, mouse, etc. The whole build in total cost me £1832 (about $2535 USD), so just under budget, which I’m happy about. Although, I wish I had spent a little more and purchased a 4K monitor (maybe in the future).
All in all, I have no complaints. It was both educational and great fun to build. The computer looks and works great, and it has handled everything I have thrown at it so far.
What’s not to like?